1、准备工作:
(1)事先在系统中已经安装好mysql数据库
(2)在系统控制台通过pip install pymysql,安装python的第三方数据库模块
2、利用python连接数据库
1
2
3
4
|
import pymysql
conn = pymysql.connect(host="127.0.0.1",user="root",password="123",database="test",charset="utf8")
|
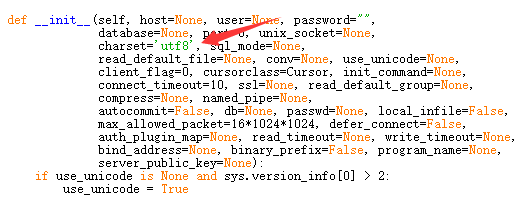
需要注意的是:为避免出现中文乱码,最好填写charset=”utf8”,中间没有”-“,若写成”utf-8”是错误的。
如果觉得麻烦的话,有个方法,首先找到系统中pymysql包安装的位置,在cmd中输入pip show 模块名即可找到。
然后进入”pymysql”文件夹,找到里面的”connections.py”文件并打开,”ctrl+F”找到”charset”默认情况下是空值,输入”utf8”,同样不需要”-“。

到此你就完成了对系统中的数据库的连接。
3、创建数据库表格
1
2
3
4
5
6
7
8
9
10
11
12
13
14
15
16
17
18
|
cursor = conn.cursor()
sql = '''
create table employee(
eid char(10) not null,
ename char(10),
whno char(10),
salary float,
primary key(eid)
)
'''
cursor.execute(sql)
cursor.close()
conn.close()
|
4、增、删、改操作
1
2
3
4
5
6
7
8
9
10
11
12
13
14
15
16
17
18
| import pymysql
conn = pymysql.connect(host='localhost', user='root', password='123', db='test', charset='utf8')
cursor = conn.cursor()
sql = "insert into employee values ('001', '王三', '301', 1000.0)"
cursor.execute(sql)
conn.commit()
cursor.close()
conn.close()
|
这里值得注意的是,必须要在完成操作之后使用commit()命令进行提交,否则操作的数据不生效。
5、数据的查询操作
fetchone():获取下一行数据,第一次为首行;
fetchall():获取所有行数据源
fetchmany(n):获取n行数据
(1)使用fetchone():
1
2
3
4
5
6
7
8
9
10
11
12
| import pymysql
conn = pymysql.connect(host='localhost', user='root', password='123', db='test', charset='utf8')
cursor = conn.cursor()
sql = 'select * from employee'
cursor.execute(sql)
rst = cursor.fetchone()
print(rst)
next_rst = cursor.fetchone()
print(next_rst)
cursor.close()
conn.close()
|
运行结果:
1
2
3
| ('001', '王三', '301', 1000.0)
('002', '李四', '302', 3000.0)
>>>
|
(2)使用fetchall():
1
2
3
4
5
6
7
8
9
10
| import pymysql
conn = pymysql.connect(host='localhost', user='root', password='123', db='test', charset='utf8')
cursor = conn.cursor()
sql = 'select * from employee'
cursor.execute(sql)
rsts= cursor.fetchall()
print(rsts)
cursor.close()
conn.close()
|
运行结果:
1
2
| (('001', '王三', '301', 1000.0), ('002', '李四', '302', 3000.0))
>>>
|
默认情况下,我们获取到的返回值是元组,只能看到每行的数据,却不知道每一列代表的是什么,这个时候可以使用以下方式来返回字典,每一行的数据都会生成一个字典:
1
| cursor = conn.cursor(cursor=pymysql.cursors.DictCursor)
|
在fetchone示例中,在获取行数据的时候,可以理解开始的时候,有一个行指针指着第一行的上方,获取一行,它就向下移动一行,所以当行指针到最后一行的时候,就不能再获取到行的内容,所以我们可以使用如下方法来移动行指针:
1
2
| cursor.scroll(1,mode='relative')
cursor.scroll(2,mode='absolute')
|
第一个值为移动的行数,整数为向下移动,负数为向上移动,mode指定了是相对当前位置移动,还是相对于首行移动
1
2
3
4
5
6
7
8
9
10
11
12
13
14
15
16
17
18
19
| import pymysql
conn = pymysql.connect(host='localhost', user='root', password='123', db='test', charset='utf8')
cursor = conn.cursor(cursor=pymysql.cursors.DictCursor)
sql = 'select * from employee'
cursor.execute(sql)
rst = cursor.fetchone()
print(rst)
rst = cursor.fetchone()
print(rst)
cursor.scroll(-1,mode='relative')
rst = cursor.fetchone()
print(rst)
cursor.scroll(0,mode='absolute')
rst = cursor.fetchone()
print(rst)
cursor.close()
conn.close()
|
#结果如下
1
2
3
4
| {'Eid': '001', 'Ename': '王三', 'Whno': '301', 'Salary': 1000.0}
{'Eid': '002', 'Ename': '李四', 'Whno': '302', 'Salary': 3000.0}
{'Eid': '002', 'Ename': '李四', 'Whno': '302', 'Salary': 3000.0}
{'Eid': '001', 'Ename': '王三', 'Whno': '301', 'Salary': 1000.0}
|
(3)使用fetchmany():
1
2
3
4
5
6
7
8
9
10
| import pymysql
conn = pymysql.connect(host='localhost',user='root', password='123', db='test', charset='utf8')
cursor = conn.cursor(cursor=pymysql.cursors.DictCursor)
sql = 'select * from employee'
cursor.execute(sql)
rsts = cursor.fetchmany(2)
print(rsts)
cursor.close()
conn.close()
|
#结果如下:
1
| [{'Eid': '001', 'Ename': '王三', 'Whno': '301', 'Salary': 1000.0}, {'Eid': '002', 'Ename': '李四', 'Whno': '302', 'Salary': 3000.0}]
|


